

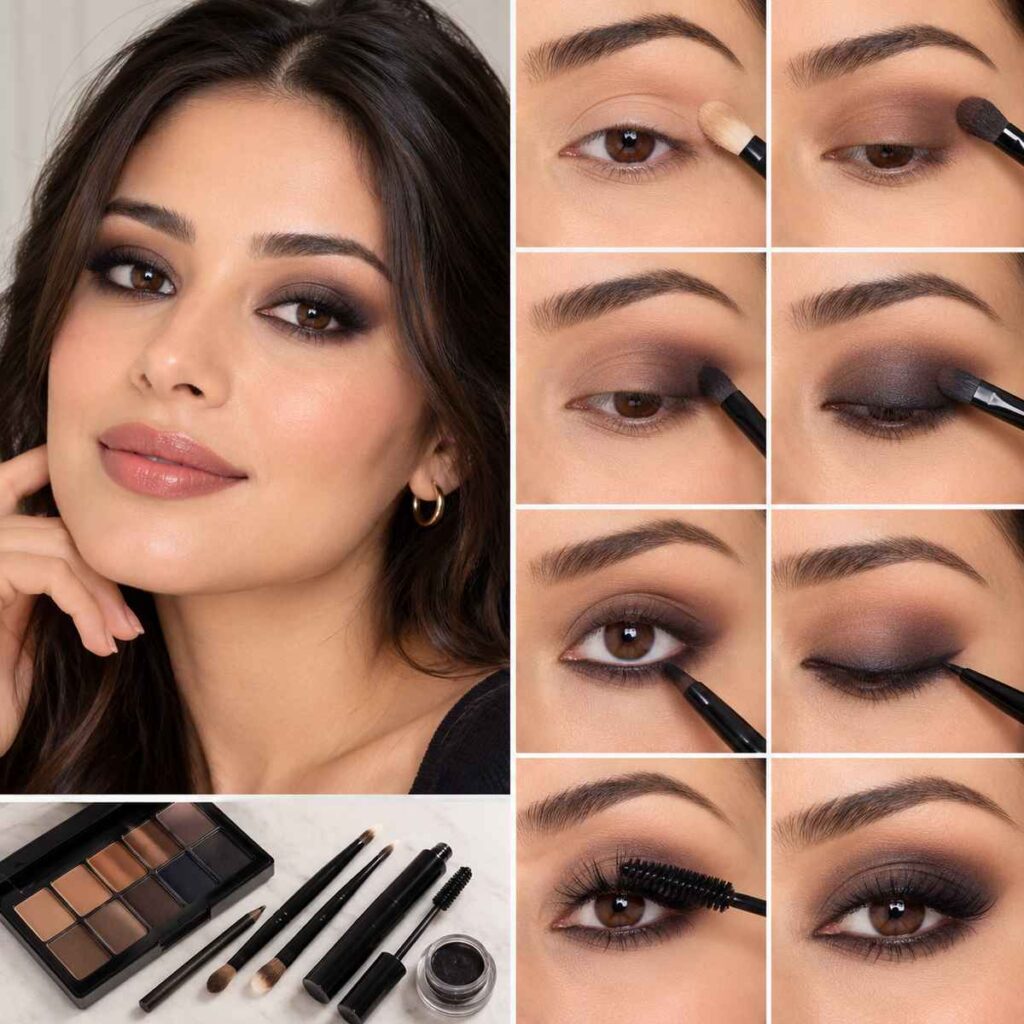
Few makeup looks are as universally recognized and as consistently flattering as the classic smokey eye. It can transform simple daytime makeup into something dramatic and evening-appropriate, add depth and intensity to your gaze, and works across virtually every eye color and shape when done correctly. Yet many people shy away from attempting it, assuming it requires professional skill or expensive products. Learning how to do a smokey eye is actually far more achievable than it looks, and with the right technique, blending approach, and a bit of practice, anyone can master this iconic look.
This guide walks through a complete step-by-step smokey eye tutorial, product recommendations, blending techniques, variations for different eye shapes and skin tones, common mistakes to avoid, and tips for making the look last all day or night.
What Makes a Smokey Eye Work
At its core, a smokey eye is about creating a soft, gradual blend of dark and medium tones around the eye, with no harsh lines or visible edges. The “smoke” effect comes from this seamless transition between shades, rather than from any single specific color or product. While black and gray are the traditional smokey eye colors, the technique works beautifully with browns, plums, navy, and even bold colors like deep green or burgundy for a modern twist.
Products You Will Need
- An eyeshadow primer to help colors adhere better and last longer
- A light, matte transition shade close to your natural skin tone or slightly deeper
- A medium-toned shadow for the crease
- A dark shadow, whether matte or shimmer, for the outer corner and lash line
- A shimmer or metallic shade for the center of the lid, optional but adds dimension
- A black or dark brown eyeliner or pencil for the lash line and waterline
- Mascara, and false lashes if desired
- Blending brushes, ideally a few different sizes for different areas
- A flat shader brush for packing on color
- A pencil brush for precise application in the outer corner
You do not need an extensive, expensive collection to create a beautiful smokey eye. A simple eyeshadow palette with a range of matte and shimmer shades in the same color family is often all you need.
Step 1: Prep Your Eyes
Start by applying a small amount of eyeshadow primer across your entire eyelid, up to the brow bone. This step helps prevent creasing, makes colors appear more vibrant, and extends the wear time of your look significantly. Allow the primer to set for a minute before moving on.
Step 2: Apply the Transition Shade
Using a fluffy blending brush, sweep your light, matte transition shade across your entire eyelid and up into the crease. This shade should be close to your natural skin tone or just slightly deeper, and its job is to create a soft base that makes blending the darker colors much easier in later steps. Build the color gradually rather than applying too much at once.
Step 3: Define the Crease
Using a slightly smaller, fluffy brush, apply your medium-toned shadow into the crease of your eye, using a windshield-wiper motion to blend it in. This step begins to add depth and dimension. Focus the color more heavily toward the outer corner, tapering it as you move toward the inner corner for a natural gradient.
Step 4: Build the Darkest Shade
Using a flat shader brush or a dense blending brush, apply your darkest shadow to the outer corner of your eye, forming a soft V shape that extends slightly into the crease. Work this color in with small, circular motions, gradually building intensity rather than applying it all at once. This is the step that creates the signature smokey effect, so take your time blending the edges so there are no harsh lines.
Step 5: Blend, Blend, Blend
This is the single most important step for achieving a professional-looking smokey eye. Using a clean, fluffy blending brush, go back over the edges where your transition, medium, and dark shades meet, using gentle circular motions to soften any harsh lines. Step back periodically to assess your progress, since blending often requires several passes to achieve a truly seamless gradient.
Step 6: Add Shimmer to the Center of the Lid (Optional)
For added dimension and a bit of sparkle, pat a shimmer or metallic shade onto the center of your eyelid using your fingertip or a flat brush. This technique, sometimes called a “foiled” center, catches the light and adds visual interest to the overall look, particularly for evening occasions.
Step 7: Line Your Eyes
Using a black or dark brown eyeliner, line your upper lash line, staying as close to the lashes as possible. For a more intense smokey effect, you can also line your waterline with a dark pencil, which helps make your lashes appear fuller and adds to the overall smoky intensity.
Smudge the liner slightly using a small brush or a cotton swab to soften any harsh lines and integrate it with your eyeshadow for a cohesive look.
Step 8: Apply Mascara and Lashes
Curl your lashes if desired, then apply a few coats of mascara, focusing on both the roots and tips for maximum volume and length. If you want additional drama, individual or strip false lashes can enhance the overall smokey eye effect, particularly for evening looks.
Step 9: Clean Up and Finish
Use a cotton swab dipped in a small amount of makeup remover to clean up any fallout beneath your eyes, and apply a bit of concealer if needed to perfect the under-eye area. Finish your overall makeup look, such as foundation, blush, and lip color, after completing your eye makeup, since smokey eye application often creates some fallout that is easier to clean up before finishing the rest of your face.
Variations for Different Eye Shapes
Hooded Eyes
For hooded eyes, where the lid crease is less visible or partially covered by the brow bone, focus your darker shades slightly above where you can see your natural crease when your eyes are open, rather than strictly in the physical crease itself, which may be hidden. This helps ensure the smokey effect remains visible even with your eyes open.
Monolid Eyes
For monolid eyes, which have minimal or no visible crease, create a soft gradient by applying your darkest shade close to the lash line and gradually blending upward and outward, rather than relying on a defined crease placement. A soft, diffused approach tends to work particularly well for this eye shape.
Round Eyes
For rounder eyes, extend your darkest shade slightly beyond the outer corner in a subtle wing shape, which helps elongate the eye shape and adds a more almond-like appearance.
Downturned Eyes
For downturned eyes, focus on lifting the outer corner by applying your darkest shade in an upward diagonal direction at the outer corner, rather than following the natural downward slope of the eye.
Close-Set Eyes
For close-set eyes, concentrate your darkest colors on the outer corners and keep the inner corners lighter and brighter, which helps create the illusion of more space between the eyes.
Color Variations Beyond Classic Black and Gray
Brown Smokey Eye
Using various shades of brown, from a light tan transition to a deep chocolate for the outer corner, creates a softer, more wearable daytime version of the smokey eye, suitable for both professional and casual settings.
Plum or Burgundy Smokey Eye
Deep plum and burgundy tones offer a sophisticated alternative to traditional black, often complementing a wide range of skin tones beautifully while feeling slightly less harsh for daytime wear.
Navy Smokey Eye
Navy blue, particularly in the outer corner and crease, creates a striking alternative to black, often making the whites of the eyes appear brighter by contrast, and works especially well for those with brown or hazel eyes.
Bronze or Copper Smokey Eye
Warm bronze and copper tones create a sun-kissed, glamorous version of the smokey eye, particularly popular for warmer seasons and complementing green or hazel eyes.
Tips for Making Your Smokey Eye Last All Day
- Always use an eyeshadow primer, which significantly extends wear time and prevents creasing throughout the day.
- Set your eyeliner with a matching eyeshadow pressed on top, which helps prevent smudging, especially for the waterline.
- Use waterproof formulas for both eyeliner and mascara if you anticipate a long day, humid weather, or an event involving potential tears, like a wedding.
- Avoid touching or rubbing your eyes throughout the day, which can cause smudging and fallout.
- Carry a small concealer brush and concealer for quick touch-ups if needed later in the day.
Common Smokey Eye Mistakes to Avoid
- Skipping the blending step, which results in harsh, visible lines between colors rather than the soft gradient that defines the look.
- Using too much product too quickly, making colors difficult to blend and control. Build intensity gradually instead.
- Applying color unevenly between both eyes, which is a common beginner mistake. Work on both eyes somewhat simultaneously, switching back and forth, rather than completing one eye entirely before starting the other.
- Forgetting to blend eyeliner into the eyeshadow, leaving a visible, disconnected line rather than an integrated, cohesive smokey effect.
- Choosing colors that are too similar in tone, which makes it difficult to create visible dimension and gradient. Ensure enough contrast between your transition, medium, and darkest shades.
- Neglecting to clean up fallout before finishing the rest of your makeup, leaving stray eyeshadow particles under the eyes.
Smokey Eye for Different Occasions
For daytime or office settings, opt for softer brown or taupe tones with less intensity, keeping the overall effect more subtle and wearable.
For evening events, embrace deeper, more dramatic colors like black or deep plum, and consider adding false lashes and a more intense application for maximum impact.
For special occasions like weddings, use waterproof, long-wearing formulas, and consider a slightly softer application that photographs well without appearing overly harsh in flash photography.
Frequently Asked Questions
What is the easiest way to blend eyeshadow for a smokey eye?
Using a clean, fluffy blending brush with gentle circular motions, working in small sections and building color gradually, tends to be the most effective and beginner-friendly blending technique.
Can I do a smokey eye without false lashes?
Absolutely. False lashes can enhance the look but are entirely optional. Several coats of a good mascara can still create a beautifully dramatic effect on their own.
What eyeshadow colors work best for a smokey eye?
While black and gray are traditional choices, brown, plum, navy, and bronze tones all work beautifully and can be more versatile and wearable depending on the occasion and your skin tone.
How do I keep my smokey eye from looking too harsh?
Focus heavily on blending the edges between your transition, medium, and dark shades, and consider softer color choices like brown or taupe if you want a more subtle, wearable version of the look.
Is a smokey eye suitable for everyday wear?
A softer, more muted version using brown or taupe tones can absolutely work for everyday wear, while more intense black or jewel-toned versions are often better suited for evening occasions.
How long does it take to master a smokey eye?
Like most makeup techniques, it improves significantly with practice. Many people find that after a handful of attempts, their blending technique and overall application become noticeably faster and more polished.
Final Thoughts
Learning how to do a smokey eye is a valuable addition to anyone’s makeup skill set, offering a dramatic, versatile look that works across countless occasions and eye shapes. The key lies not in expensive products but in patient, thorough blending and building color gradually rather than applying everything at once. Start with a simple brown or neutral palette to practice the technique, and once you feel confident with the basic blending approach, experiment with bolder colors and more dramatic intensity for evening looks.
With a bit of practice, what once felt like an intimidating, professional-only technique will become a reliable go-to look you can recreate confidently whenever the occasion calls for a bit of extra drama.